Implementing PAC Files for IP-Based Groups
The instructions for implementing your PAC file depend on whether you configured the service by using the Desktop Web Proxy (DWP) or by using IP-based groups. Do either of the following:
If you are using IP-based groups, that is, no Desktop Web Proxy (DWP) client, then you must configure your endpoints to use the PAC file. If your company is on a domain, use a Group policy to configure this setting.
To implement PAC files for IP-based groups:
- In the Active Directory of your Windows Server, from User Configuration select Policies > Windows Settings > Internet Explorer Maintenance > Connection > Automatic Browser Configuration.
- Deselect the Automatically detect configuration settings checkbox.
- Select the Enable Automatic Configuration checkbox.
- Leave the Configuration Time field blank.
This forces the browser to use the PAC file at all times.
- Paste the PAC file URL into the Automatic proxy URL field and click the OK button.
Applying Settings to Web Browsers
If your company is not on a domain, you must apply this setting to each browser manually. To do this, proceed with the instructions for either of the following:
- Internet Explorer
- Mozilla Firefox
To configure Internet Explorer:
- Open Internet Explorer and from the Tools menu, select Internet Options.
- Click the Connections tab.
- Click LAN Settings.
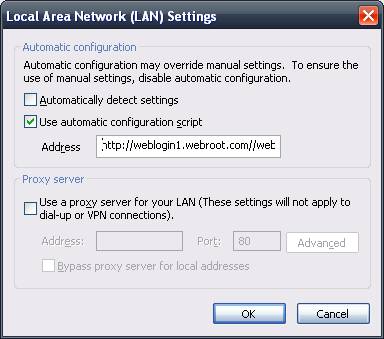
The Local Area Network (LAN) Settings dialog displays.
- Select the Use automatic configuration script checkbox.
- In the Address field, enter the URL for the proxy file.
You can find this URL in the To call your Proxy PAC file use the following url field in the PAC File tab of the Management Portal. This is the unique address for your account.

- Click the OK button.
- Repeat these steps for each user's browser.
To configure Mozilla Firefox:
- Open Firefox and from the Tools menu, select Options.
- Click the Advanced tab, then click Network.
- Click Settings.
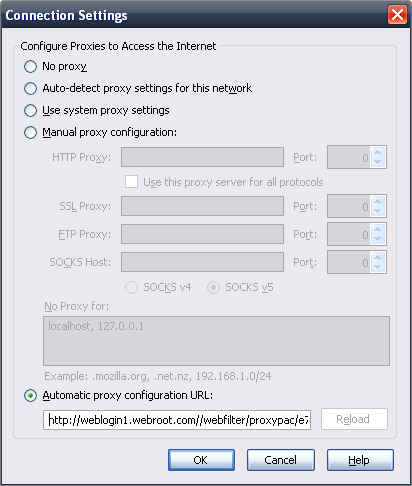
The Connection Settings dialog displays.
- Select the Automatic Proxy Configuration URL radio button.
- In the address field, enter the URL forthe proxy file.
You can find this URL in the To call your Proxy PAC file use the following url field in the PAC File tab of the Management Portal. This is the unique address for your account.

- Click OK.
- Repeat these steps for each user's browser.


